Haybusa Parts and Service Member Support

Author Topic: AirFx front, rear, and landing gear system with instant up & micro-buttons  (Read 8281 times)

Offline unit176

  • Post Whore
  • ****
  • Posts: 986
  • Gender: Male
  • Bigger is better!
Just wanted to post a little something to let everyone know that I have sealed a deal with AirFx air suspensions to run their complete air ride system, front, back, and landing gear.  Its hard to express how much of pleasure it was working this last detail out with the founder of AirFx himself, Jeff Schwindt. 
I will be able to post pics of the complete package parts, installation pics, & give you guys a good write up on the overall system.  From speaking with Jeff it seems they are way ahead of the curve with the development of their systems, & it should be a verry impressive feature of any build.  I managed to locate a few pics of the system, and a nice video that is posted on their web site that shows all the features of their products in action...not to mention their cool show bike!
Enjoy the post, let me know if you have any questions or if I can be of any help with your desicion to go pneumatic. 


http://www.youtube.com/watch?feature=player_embedded&v=RpaMY0TauzU

Offline unit176

  • Post Whore
  • ****
  • Posts: 986
  • Gender: Male
  • Bigger is better!
Like promised I started the install of my air-ride setup today, under the guidance of my builder (the isntructions advise that an expert or specialist do this intsall).  I recommend that you have supervision if you are not mechanicaly inclined as the suspension requires that you properly set it up or you could be injured...warnings aside...I feel that the install is realy straight forward and can be done by most anyone with the ability to read and comon mechanical skills. 
I will post a step by step process of building the front end system, & I am sure you will see from the pics that it is rather simple so far:

STEP 1: FIND A WAY TO SUPPORT THE FRONT END SO THAT THE WHEEL ASEMBLY CAN BE REMOVED AND THE FRONT FORK TUBES TAKEN OFF THE BIKE.  I HAPPEN TO HAVE AN OLD RACING STAND THAT DOUBLES AS A FRONT END LIFT, & FOR EXTRA SUPPORT I RAN A METAL REBAR PIPE THROUGH ONE OF THE MOTOR MOUNTS WITH CAR JACK STANDS TO HOLD IT STEADY FROM THE REAR.


ONCE YOU HAVE THE TUBES OUT THE NEXT STEP IS TO BEGIN DISASEMBLING THEM BECAUSE THE OLD INTERNALS WILL BE REPLACED BY AIRFX'S AIR-RIDE SET UP.  TO BEGIN DISASEMBLY YOU MUST FIRST REMOVE THE BOLT THAT IS ON THE UNDERSIDE OFTHE FORK TUBE LEG, DISCARD THIS BOLT AS AIRFX PROVIDES ONE THAT IS SPECIFICLY MADE FOR THEIR SET UP.  SHOULD YOU CONFUSE THE STOCK ONE AND USE IT YOU WILL DESTROY THE THREADS ON THE AIRFX SET UP.


YOU ARE NOW READY TO UNSCREW THE INTERNALS FROM THE TOP OF THE FORK TUBE.  PUT THE STOCK INTERNALS ASIDE AS THEY WILL BE COMPLETLY REPLACED WITH THE NEW AIRFX PARTS, WHICH SLIDE IN AFTER YOU APPLY A LIBERAL AMOUNT OF GREASE TO THE LOWWER FORK LEG AND ALL SEALS(SPECIFIC GREASE IS SUPPLIED WITH THE KIT).  NOTE THAT YOU NO LONGER NEED ANY FORK OIL, I FORGOT TO MENTION THAT YOU WILL DRAIN THE OIL OUT OF THE STOCKERS BECAUSE MY FORKS WERE RECENTLY MOCKED UP AND DIDN'T HAVE ANY IN THEM. AT THIS POINT YOU DON'T SCREW THE FORK INTERNALS IN YET.


Offline unit176

  • Post Whore
  • ****
  • Posts: 986
  • Gender: Male
  • Bigger is better!
ONCE THAT IS COMPLETED THE NEXT STEP IS TO TAKE THE SUPPLIED ALLEN HEAD BOLT FROM AIRFX, GREASE IT, AND RUN IT THROUGH THE BOTTOM OF THE FORK LEG, LINE IT UP WITH THE BOTTOM OF THEIR AIR-RIDE SYSTEM AND SCREW IT TIGHTLY IN PLACE...DON'T OVER TIGHTEN AS THEIR SYSTEM IS MADE FROM BILLET ALUMINUM AND YOU DON'T WANT STRIP THE THREADS.  NOTE THE HARDWARE/ALLEN HEAD SCREW THEY PROVIDE IS TOP NOTCH AND APPEARS TO BE MADE OF STAINLESS STEEL.


ONCE YOU HAVE TIGHTEND THE BOTTOM BOLT, LOCKING IN PLACE THE LOWWER PORTION OF THEIR AIR-RIDE SYSTEM, YOU ARE NOW FREE TO TIGHTEN THE TOP OF THE FORK TUBE INTERNALS WITH AN ADJUSTABLE WRENCH AFTER YOU GREASE THE TOP THREADS, NATURALY.  YOU NOW HAVE AN ASSEMBLED FORK WITH THEIR AIR-RIDE SYSTEM!  RELATIVELY SIMPLE IF YOU ASK ME.  SLIDE THE FORK TUBES BACK IN THE TRIPPLE TREES, MAKE SURE THEY ARE EQUALY SET IN HEIGHT, AND TIGHTEN THE TRIPPLE TREES.


HERE ARE A FEW PICS OF THE TOP VEIW OF THE FORK TUBES, AND SOME OF THEIR SUPPLIED FORK CAP COVERS (NICE ADDITION TO THE SYSTEM & THEY ARE THE BEST FITTING CAPS I HAVE EVER SEEN ON THE MARKET.  THEY ONLY NEED TO BE SENT OUT FOR CHROME NOW!


Offline unit176

  • Post Whore
  • ****
  • Posts: 986
  • Gender: Male
  • Bigger is better!
Just a side note, check your clearances as the fork tubes will now drop almost all the way down with out any air in them...so you don't want the front wheel or fender to crash into anything like the bottom tripple tree or radiator...so make sure you adust the height of the front forks through the tripples properly and slowly test them for clearance once you drop the bike back to the ground.   
I ran out of time and wasn't able to hook the system up to an air supply, but as soon as I have time I will post up a video of the system in action and my thoughts and comments.  I did get a chance to mount up the rear air-ram, and I have quite a bit of good comments to give it in my next post. 

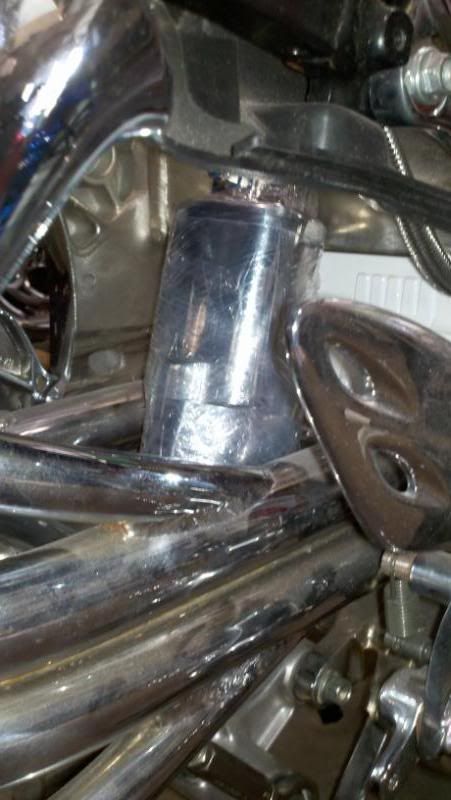
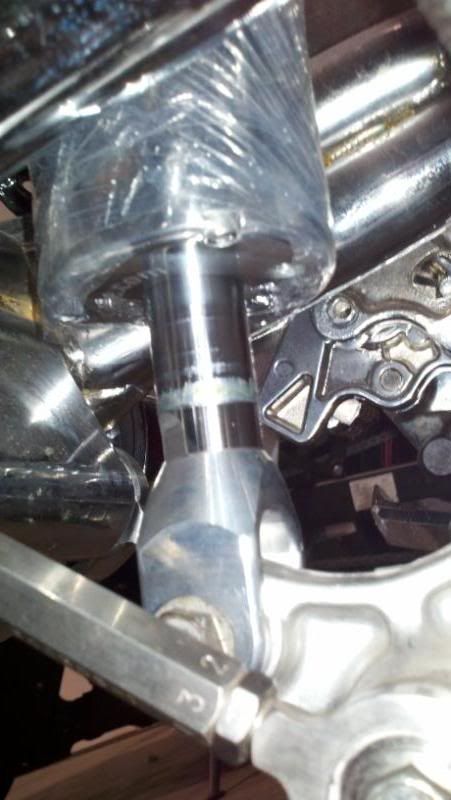
The rear air-ram system they supplied is the nicest I have seen.  I exprienced a problem with some of the other manufacturers systems that required alot of modification to work with my specific swingarm.  The problems that I expereinced was that their rear ram was so huge it would crash into the swingarm when dropped all the way down.  The only way to fix this was to machine the outter circumference of the rear ram down to clear the swingarm, not ideal in my mind as these things hold pressure and are probably designed to withstand so much in their initial design. 

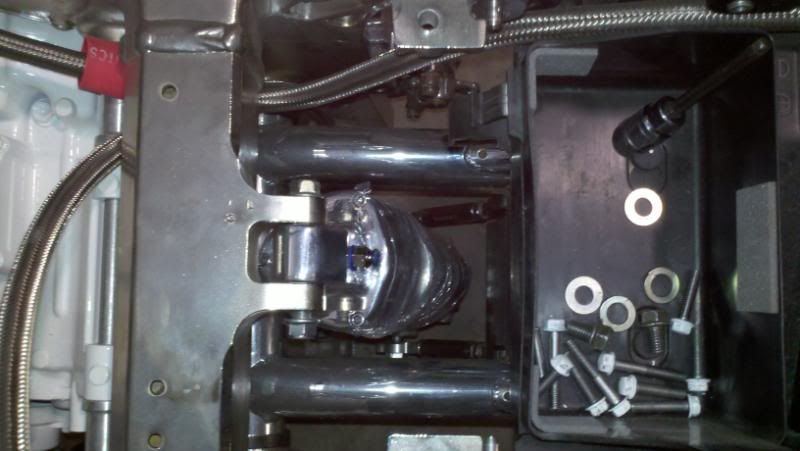
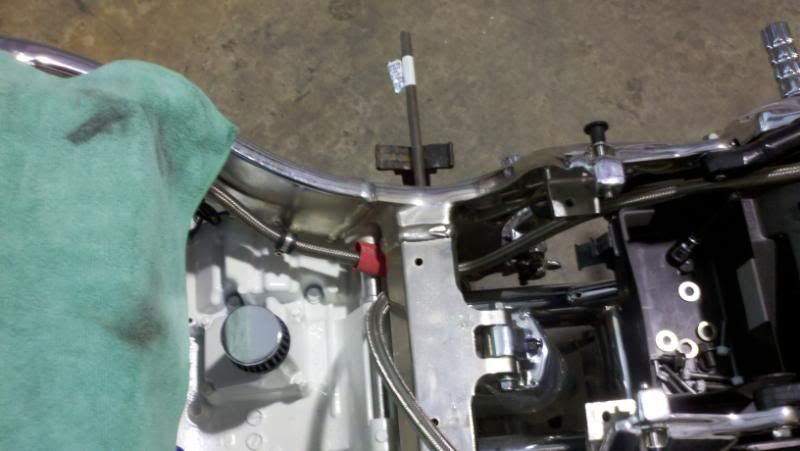
Anyhow, the AirFx system fit perfectly without any crashing into the swingarm issues!  Wooohoo!  The only issue I ran into was a minor one caused by installation of the 2nd generation tail on my 1st generation busa.  You see the tail slants down futher in the back than the original, so when my air-ride is at its lowest point the tail hits the wheel, even with my adjustable links set all the way to help stop this.  Luckily the bottom bracket of the system seems to unbolt and I think I will call Jeff at AirFx to see if he can machine a spacer to raise the rear of the bike up at its lowwest point so it doesn't rip my tail fairing off when I drop it down at speed.  Simple fix.  Check out the pics of the mock-up:


Offline MITCH1914

  • Post Whore
  • ****
  • Posts: 620
  • Gender: Male
  • G.O.M.A.B.
nice
G.O.M.A.B.

Offline m4f1050

  • New User!
  • *
  • Posts: 1
  • Enthusiast
Hi, does anybody know what the OD is on this system?  Looks like 3/16" or 5/32"...

Edit: Got my system, AirFX uses 5/32" OD pneumatic quick lock.
« Last Edit: June 01, 2015, 06:17:13 PM by m4f1050 »